This user guide intends to document all the configuration settings available in the myphone Self Care Portal.
Note: Cisco Unified Communications Self Care Portal supports the following web browsers for release 10.5
- Windows 7 – IE 9 and 10
- Windows 8 and above – IE 11, Firefox 10 and 17 ESR, and Chrome 25 or the latest
- Mac OS – Safari 6
Introduction to the Self Care Portal
Your Cisco Unified IP Phone is a network device that can share information with other network devices in your company, including your personal computer.
Sign in to your myphone Self Care Portal on your computer, where you can control features, settings, and services for your Cisco Unified IP Phones. For example, you can configure speed dial numbers, contact lists, and call forwarding settings.
Note: Some of the settings that appear in this guide may not appear when you set up your phone in the myphone Self Care Portal due to the following factors:
- Phone Capabilities – If a particular feature is not available for your specific phone model, that feature does not appear when you set up your phone on the portal.
- Enterprise Capabilities – Your network administrator may have limited the settings that users can configure on the portal.
If a setting in this guide does not appear when you configure your user settings on the portal, check your phone documentation to ensure the feature is available. If the feature is available for your phone, contact support, as the feature may not be available for configuration.
The Graphical User Interface
The Cisco Unified Communications Self Care Portal uses a web-based graphical interface that contains three tabs. Each tab includes a link to different options that the user can configure.
Logging Out
To log out, click your Unity ID in the upper right-hand corner of the screen and select Sign Out.
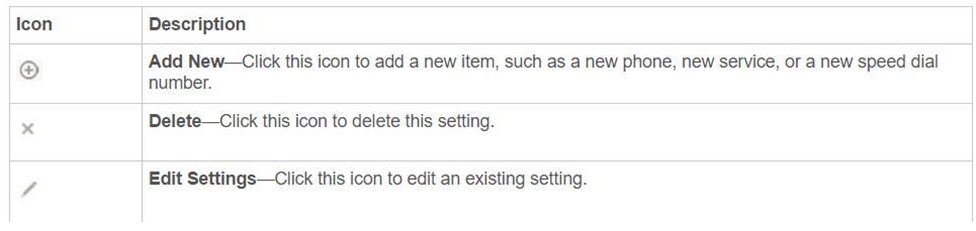
Common Features and Icons
Phones Tab
The Phones tab contains three submenus:
- My Phones – You can view a summary of your phones and add new ones.
- Phone Settings – You can configure phone settings like speed dial numbers and voicemail notifications.
- Call Forwarding - You can configure call forwarding options to a new destination or voicemail.
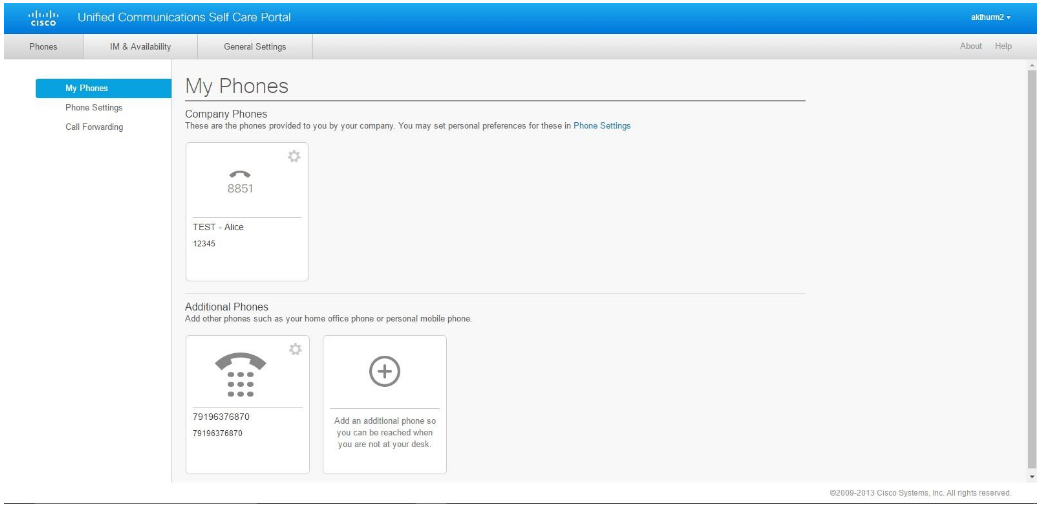
My Phones
You’ll see all of your NCSU phones in the My Phones section. You can select any device and configure settings or download the phone manual by clicking on one of your company phones, clicking the Gear icon, and selecting Download Manual.
![]()
See the Phone Settings section below for procedures to configure your company phones.
In the Additional Phones section, you can see all of the phones not provided by NCSU and add phones, such as numbers for Single Number Reach.
Set up an Additional Phone
You can set up other phones to provide a different number to reach if you are not at your desk.
- Click on the Phones tab.
- In the left navigation pane, click My Phones.
- Under Additional Phones, click the Add New icon. The Add a New Additional Phone window displays.
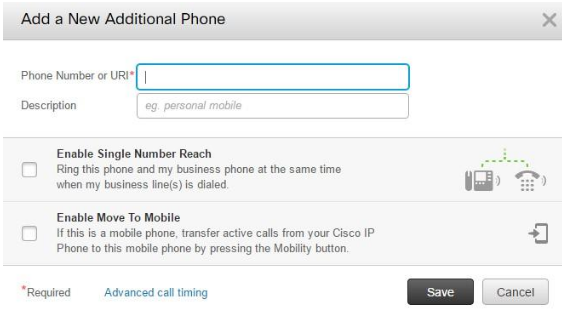
- Please enter the phone number (precisely as you would dial it from your desk phone) and a description for your phone and click Save.
Note: For Local numbers, enter 7+ the ten-digit number. For Long-Distance numbers, enter 7+1+ the ten-digit number. International numbers are not allowed, and you may only add phone numbers that match your desk phone dial plan.
Note: See below for instructions for Single Number Reach and Mobility.
Enable and Setup Single Number Reach
You can set up an additional phone and enable Single Number Reach so that your other phone also rings when someone calls your company phone.
Note: You must first enable Single Number Reach by visiting the Self-Service portal.
- Click the plus sign to enable Single Number Reach in the Single Number Reach section.
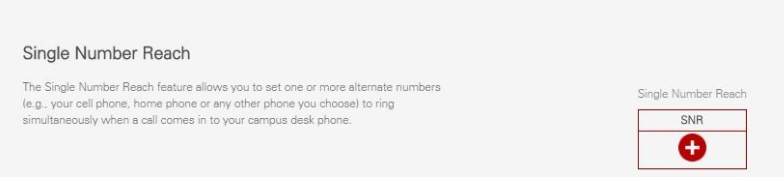
- A pop-up window will notify you that your device's service is enabled. Click OK and continue set up in the Self Care Portal (continue with instructions below).
- In the Self Care Portal, click the Phones tab.
- In the left navigation pane, click My Phones.
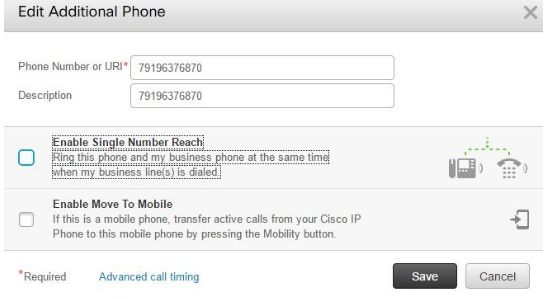
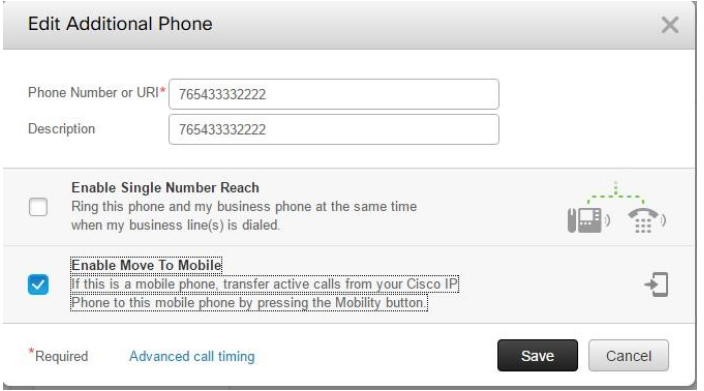
- In the Additional Phones section, click on the phone number you’d like to use for Single Number Reach and then click Edit.
Note: For Local numbers, enter 7+ the ten-digit number. For Long-Distance numbers, enter 7+1+ the ten-digit number. International numbers are not allowed, and you may only add phone numbers that match your desk phone dial plan. - Check the Enable Single Number Reach check box in the Edit Additional Phone window.
- The screen will now show the additional option to Create a schedule for this assignment.
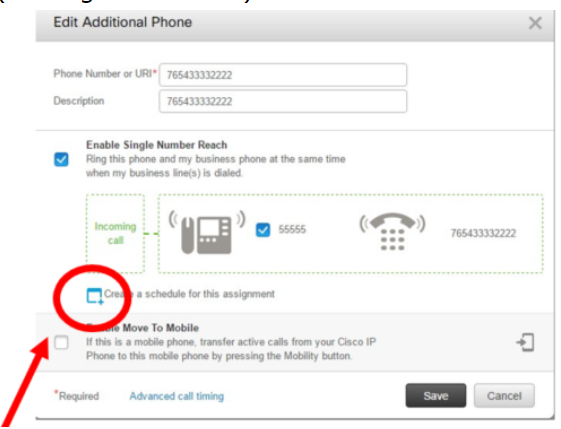
- Click the Add icon, and the Add a New Schedule window will be displayed.

- Configure your schedule and click Save when finished.
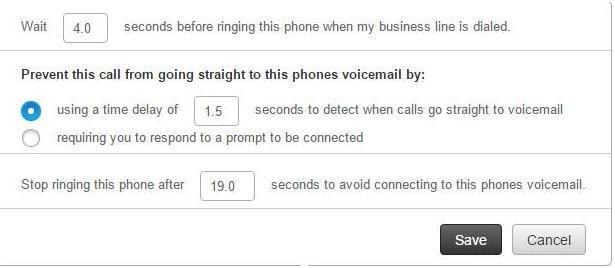
Adjust Advanced Call Timing
You can adjust the advanced call timing features to prevent any Single Number Reach calls from reaching your mobile phone’s voicemail.
Note: These settings are essential to understand before you alter the default values.
(If you wish to discuss your options, please contact a Unified Communications team member at oit_ct_uc@help.ncsu.edu.
- Wait before ring: Set the number of seconds your company phone should ring before your alternate phone begins to ring. This allows you to answer the call at your desk before ringing your alternate number.
- Prevent calls from going straight to voicemail: Set the number of seconds you would like to wait before calls go to voicemail.
- Stop ringing this phone after: Set the number of seconds to stop ringing your alternate phone to prevent reaching the voicemail on your alternate phone.
- Click the Phones tab.
- In the left navigation pane, click My Phones.
- In the Additional Phones section, click on the phone number you’d to adjust the call timings for Single Number Reach and then click Advanced Call Timing.
- Adjust the settings and click Save.
Set Additional Phone for Mobility Calls
You can set up an in-call transfer from one of your NCSU phones to the mobile phone. For example, if you answer an incoming call on your desk phone and need to leave your office while still on the call, press the Mobility softkey on your desk phone, and the call will transfer to your mobile phone. You can move the call back to your desk phone by hanging up the call on your mobile phone. After you hang up your mobile phone, you have ten seconds to pick up the call on your desk phone.
- Click on the Phones tab.
- In the left navigation pane, click My Phones.
- In the Additional Phones section, click on the phone number you’d like to use for Mobility Calls and then click Edit.
- Check the Enable Move to Mobile checkbox and click Save.
- Click Save.
Note: If you have more than one other phone, you can configure each one to ring when your company phone rings by repeating these steps for each phone.
Phone Settings
Note: The administrator has deactivated the following Phone Setting options:
- Services
- Ring Settings
- Voicemail Notification Settings
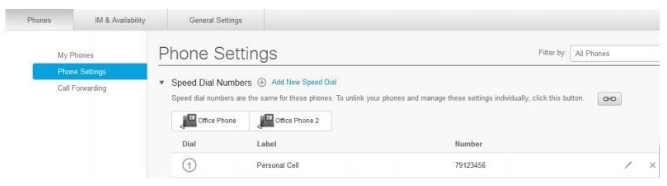
Set up Speed Dial Numbers
- Click the Phones tab.
- In the left navigation pane, click Phone Settings.
- Click Speed Dial Numbers.
- Select the phone for which you want to add the speed dial number, and then click Add New Speed Dial.
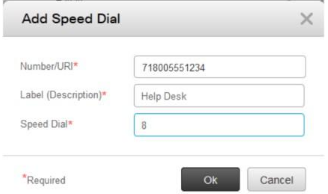
- In the Number field, enter the contact’s name or phone number. Next, the portal searches the company directory (if your network administrator has enabled you with access).
- In the Label text box, enter a description for the speed dial number. Your phone will use the description to display the speed dial number.
- In the Speed Dial text box, assign a speed dial number, and click Save.
Set up Call History
You can set up call history to log missed calls for each phone.
- Click the Phones tab.
- In the left navigation pane, click Phone Settings.
- Click Call History.
- Check the Log Missed Calls checkbox for each phone line for which you want to save the call history.
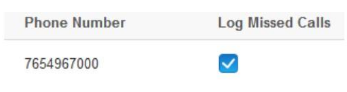
- Click Save.
Note: You can view your list of calls from your Cisco IP Phone. Please refer to your phone’s manual for instructions to access the list.
Set up Phone Contacts
You can set a list of contacts, and place calls directly from the contact list without typing in the number each time.
Note: Each user has a single contact list that is shared across all phones.
- Click the Phones tab.
- In the left navigation pane, click Phone Settings.
- Click Create New Contact. The Add New Phone Contact window appears.
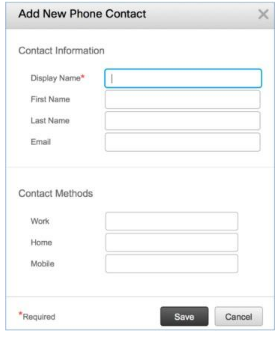
- Complete the fields with the contact information for the contact and click Save.
Call Forwarding
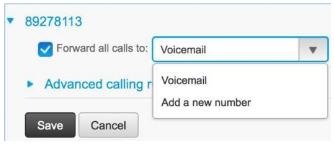
Set up Forward all Calls
You can set up your phone to forward all incoming calls on your Cisco Unified IP Phone and Jabber to another number.
- Click the Phones tab.
- In the left navigation pane, click Call Forwarding.
- Choose the phone number on which you want to set up call forwarding.
- Click the Forward Calls To checkbox.
- From the drop-down list, select Voicemail OR select Add a New Number to enter an alternate number. Remember to enter the number precisely as you would dial it from your desk phone and click Save.
Set Advanced Call Forwarding Options
You can configure call forwarding to behave differently for internal and external calls.
- Click the Phones tab.
- In the left navigation pane, click Call Forwarding.
- Choose the phone number on which you want to set up call forwarding.
- Click Advanced calling rules.
- Use the drop-down list boxes to configure call forwarding options for internal and external calls and click Save.

IM & Availability Tab
Note: The administrator has deactivated the following IM & Availability option:
- Status Policy
Turn on the Do Not Disturb Status
If Do Not Disturb is turned on, your phone does not ring when someone calls your number.
- Click the IM & Availability tab.
- Click Do Not Disturb and check the Turn on checkbox.
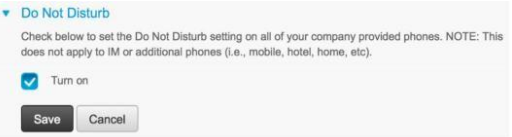
- Complete any additional Do Not Disturb settings.
Note: Additional settings appear only if your phone supports them. - Click Save. Do Not Disturb is turned on for your company phone.
General Settings Tab
Note: The administrator has deactivated the following General Settings options:
- Language
- Client/Portal Password
Set up Phone Services PIN
You can set a PIN for Extension Mobility, Self-Provisioning, and other IP phone services.
- Click the General Settings tab.
- Click Phone Services PIN.
- In the New Phone PIN text box, enter the PIN.
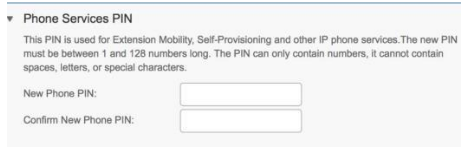
- In the Confirm New Phone PIN text box, enter the PIN.
- Click Save.